
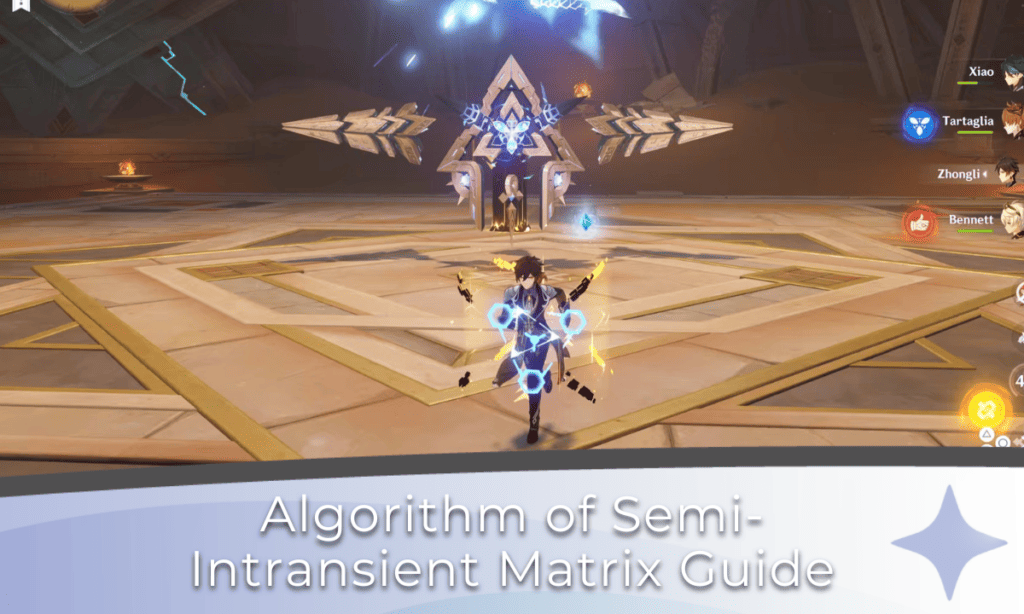
The Algorithm of Semi-Intransient Matrix Overseer Network is a Normal Boss found in the desert region of Sumeru. It is an exciting addition to the game because it was the creation of the late King Deshret. Many people in Sumeru look down on the Eremites and think of them as the “brawn,” while the residents of Sumeru are looked upon as the “brains.”
Still, the Algorithm of Semi-Intransient Matrix Overseer Network is proof enough that at one point, the Eremites would have been equal or better than the residents of Sumeru in terms of intelligence.
In the following Algorithm of Semi-Intransient Matrix guide, we will be looking at what the Algorithm of Semi-Intransient Matrix Overseer Network is, what type of attacks or stages players can expect, the team comps required to defeat this boss, and more information on the Algorithm of Semi-Intransient Matrix Overseer Network.
Location


Attacks
Laser Barrage

This attack is aimed at the ground immediately in front of the boss, and upon impact, it does physical damage. This attack is triggered during its “Recovery State” when the player does not use Electro on any parts (mentioned in the What to Expect section) before destroying it.
Laser Zone
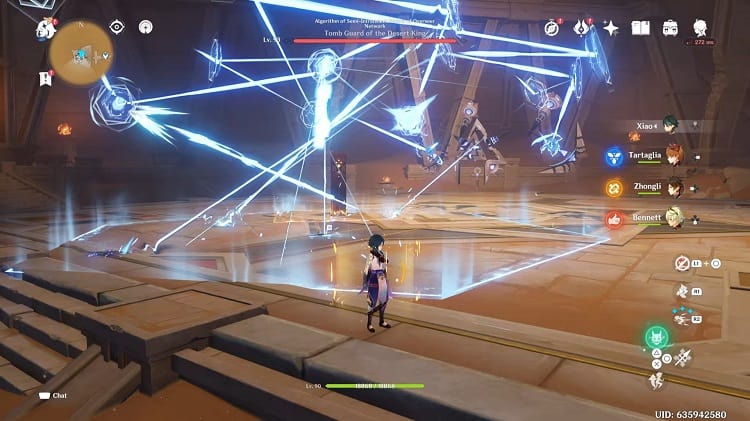
This attack will be done at the beginning of the battle and only be done once. However, this attack is very difficult to dodge, primarily since it covers an extensive AoE.
Basically, the Algorithm of Semi-Intransient Matrix Overseer Network spreads its parts across the battlefield and fires multiple lasers in various directions within a designated attack zone.
Additionally, at the end of the attack, two large laser blasts are shot as well. I recommend using a character like Zhongli to protect the on-field character with his shield.
Missile Blast

A large missile is shot at the player, dealing large damage volumes. However, the missile has a simple trajectory and only goes straight; therefore, players can dodge the attack with relative ease.
This attack is triggered during its “Recovery State” when the player does not use Electro on any parts (mentioned in the What to Expect section) before destroying it.
Overclocked Attack

This attack is triggered when the Algorithm of Semi-Intransient Matrix Overseer Network spends too much time in its invisible state.
In the duration spent invisible, the boss will gather all of its parts and draw energy; however, this is simply the initial part of the attack; once sufficient energy has been drawn, the boss will release a powerful shockwave spanning the entire arena.
This move has a relatively large “charge-up” time; therefore, players have enough time to plan how to avoid the attack; the only options would be to use a shield or a character with excellent mobility, such as Scaramouche, Kazuha, or Venti.
Prospect

A large laser beam is shot at the player; however, similar to the Missible Blast attack, the trajectory remains straight, making it pretty easy to evade.
The only difference would be the speed of the attack, and this attack is a lot faster than Missile Blast. Therefore, players need to act very quickly. This attack is carried out after the boss recovers from its paralyzed state.
Repulse

The immediate area around the player is marked, and the boss launches a missile upwards.
This missile then crashes down on the predetermined area and then deals AoE damage on impact before drilling itself into the ground dealing more AoE damage. This attack is carried out after the boss recovers from its paralyzed state.
Reshape

A force field is generated; it pushes the player back and deals damage upon contact. This attack covers a small AoE and can be avoided quite easily after players get used to the attack patterns. This attack is carried out after the boss recovers from its paralyzed state.
Tracking Laser
![]()
The boss targets the player and launches a very powerful laser beam that deals a significant amount of damage upon impact. This attack is very similar to a heat-seeking laser beam, and it would be tricky to avoid.
Therefore, I would recommend spamming the sprint button, using a character with a strong shield, or using a character with excellent mobility.
This attack is triggered during its “Recovery State” when the player does not use Electro on any parts (mentioned in the What to Expect section) before destroying it.
Stages
Invisible State

During this state, the Algorithm of Semi-Intransient Matrix Overseer Network will turn invisible, and therefore, the difficulty of the battle will increase. Additionally, the boss will gain an increased RES towards any attack, severely limiting the damage done by the player.
There are more issues that come with this state, namely, the two parts left behind on-field after the boss enters the invisible state.
These parts can deal a significant amount of damage since each part enacts a different type of attack, however, the silver lining to all of this is that these parts can be damaged.
Players need to use Dendro or Electro to deal a significant amount of damage to the parts. Additionally, players can also use Quicken reactions to paralyze the Algorithm of Semi-Intransient Matrix Overseer Network.
While the boss is invisible, it will continue moving around; therefore, unless players are able to place a marker of some kind, they will have a slight difficulty in locating the boss.
Recovery State

In order to push the Algorithm of Semi-Intransient Matrix Overseer Network into this recovery state, players need to break the on-field part(s). However, once in the recovery state, the boss will attempt to repair its damaged parts, and as a result, it will be forced to reveal itself.
Players are recommended to launch their most significant attacks during this stage; this way, while the boss is busy recuperating, players can target the weak spots and unleash their Elemental Bursts or team combos.
What to Expect – Parts
Prospector Parts

These parts float just above the ground, and as a result, they do not move around. However, they shoot laser beams in a straight trajectory dealing a large volume of damage. These attacks are quite easy to dodge as long as players can react quickly.
Repulsor Parts

These parts follow the player around the arena and deal damage on contact, and as a result, players need to be constantly moving, or they can use a shield to negate the damage.
Reshaper Parts

These parts mark a location close to the player and launch themselves at the designated area, dealing AoE damage on impact.
The attack is not done here; after the Reshaper Parts set themselves up, they will set up a wall of electricity between themselves, and as a result, it will block the player from moving past them.
However, if players have a shield or if they have characters with excellent mobility, they can get around this problem quite quickly.
In terms of what to expect; for newer players, I would say that the following points are essential;
- The Algorithm of Semi-Intransient Matrix Overseer Network will turn invisible, but do not panic! It is not a glitch; it is simply a very unique ability of the boss, similar to the way that the Pyro Fatui Agent turns invisible. In order to counter this, I would recommend taking characters that can leave a mark/ tag on the boss; this way, players can see its movements. However, I do not think it would be too necessary because the faint outline of its structure remains visible.
- The Algorithm of Semi-Intransient Matrix Overseer Network might give players trouble when it comes to its large AoE attacks. However, this issue can be dealt with as long as players use a character with a strong shield, high mobility character, or constantly sprinting. One important thing to keep in mind is that it is quite easy to fall off the edge of the arena, especially if players are backed into a corner; if players do fall off the edge, the battle will be reset, and as a result, the boss will get a full bar of health.
How to Beat the Algorithm of Semi-Intransient Matrix Overseer Network
I recommend players take a more reserved approach to this battle rather than a nose dive like most other boss battles, primarily because this boss has a wide range of attacks covering close combat and long-ranged attacks.
- Players need to have a character with a very strong shield or a character with a high level of mobility. I would recommend characters such as Xiao, Keqing, Scaramouche, Kazuha, or Venti for mobility and Zhongli, Diona, Layla, and Noelle for shielding purposes.
- Since Dendro and Electro based attacks/ reactions are the best way to deal with this boss, I would highly recommend using Quicken reaction team comps. The reason why I recommend Quicken team comps is due to the fact that aside from Dendro and Electro, Quicken is the only other reaction that will paralyze this boss.
- Do not rush into the battle; keep a regular amount of distance; by attacking and quickly falling back, evading attacks will be an effortless task. Especially given the range of attacks that this boss has in its arsenal, players can use their long/medium-ranged characters to their best.
Team Comps

In this guide, we will be looking at four sets of teams; as usual, the teams will be divided into two sections; free to play and best team comp.
Every character on these team comps is replaceable, given the player’s preference or character availability. However, the key component behind each team comp would be the Dendro and Electro application/ reaction.
Therefore, I would not recommend taking different elemental types or even changing the reaction team comps unless players plan to use brute force to defeat the boss.
Free to Play Friendly
Main Team Comp
- Main DPS – Lisa, Weapon – The Hakushin Ring
- Sub DPS – Dendro Traveler, Weapon – Iron Sting
- Support – Collei, Weapon – Favonius Warbow
- Healer – Barbara, Weapon – Prototype Amber
This team will be built around Lisa because from the available characters that are free, only Lisa is capable of dealing Electro damage.
Lisa is a capable Sub DPS/ Support character, but in these team comps, we will be using her as a Main DPS character. In my opinion, her synergy with Collei will be the deciding factor as to whether or not this team comp will work.
In the Sub DPS role, we have the Dendro Traveler, and as we know, the Dendro Traveler has excellent Dendro application capabilities.
Additionally, the Dendro Traveler excels in a Sub DPS role; therefore, we will be able to gain the maximum out of their kit. I would recommend keeping a steady level of energy because the availability of the Elemental Burst will be the deciding factor as to how much damage can be done.
Collei will be helping the Dendro Traveler by generating extra Dendro energy particles and additional energy particles through the Favonius Warbow weapon as well.
Her Elemental Skill and Elemental Burst will also provide an off-field Dendro application, similar to the Dendro Traveler. This will give Lisa ample time and Dendro application to conduct Dendro- Electro based reactions through her own Electro application.
As always, Barbara will be our go-to healer; however, one problem that will come up during the course of the battle would be that Barbara might accidentally apply Hydro and mess with any reactions that are already going on.
Therefore, I would recommend using her after the required amount of damage is done via the Dendro- Electro reactions. Barbara would be great at healing the entire team, especially when coupled with Prototype Amber.
Alternate Team Comp
- Main DPS – Lisa, Weapon –The Hakushin Ring
- Sub DPS – Collei, Weapon – Favonius Warbow
- Support – Xiangling, Weapon – Moonpiercer
- Healer – Noelle, Weapon – Whiteblind
Once again, Lisa will be leading the frontline, and she will be the one dealing most of the on-field damage. Her Electro application will be the focal point of the damage; therefore, I would recommend keeping her on the field for as long as possible with her Elemental Burst activated.
Players can use the weapon passive of “The Hakushin Ring” to deal additional damage that will go a long way in this battle because it will buff Collei’s damage output as well.
In my opinion, Lisa with “The Hakushin Ring” is a very underrated combo in terms of free to play options for her, especially in a scenario such as this, where Electro related elemental reactions will go a long way.
Collei will play the Sub DPS role, where she will apply Dendro constantly via her charged aimed shot, Elemental Skill, and Elemental Burst as well. I would recommend trying to keep the above-mentioned attacks on-field constantly in order to gain the maximum out of Collei’s Dendro application.
Alternatively, if players want to/ already have built a Main DPS Collei, they can use this Collei on-field for the majority of the battle while Lisa can be swapped in to deploy her Elemental Burst.
But, I would not recommend that because Collei has two extraordinary off-field Dendro application abilities that can help maximize Lisa’s damage output.
The reason I included Xiangling in this team comp is because of the weapon that she can use in this situation, which will enhance the team’s damage output. Xiangling is an excellent Pyro applier; therefore, she would be a liability to the team because she will interfere with the Dendro- Electro reactions.
Therefore, I would highly recommend using her before or after players carry out their Dendro- Electro reactions, this way, she can provide players with a really strong buff.
For the healer slot, I went with Noelle because she can multi-task by healing and providing shields at the same time. She is a reliable unit if players need to deal damage as well, while the Main DPS and Sub DPS characters recuperate or take some time off to run the cooldowns down.
Players can also benefit from her Crystalize reactions since they will provide additional shields; however, her Geo application will have to react with Pyro (beneficial for the team because it removes the Pyro status from the opponent) or Electro (avoid this because it will interfere with the Dendro- Electro reactions).
Best Team Comp

Main Team Comp
- Main DPS – Raiden Shogun, Weapon – Engulfing Lightning
- Sub DPS – Fischl, Weapon – Rust
- Support – Nahida, Weapon – A Thousand Floating Dreams
- Healer – Jean, Weapon – Aquila Favonia
The focal point of the damage dealt via this team comp would be through Raiden Shogun’s Elemental Burst, with support from Nahida’s Elemental Burst as well.
The most crucial part of the attacking play would be to mark the Algorithm of Semi-Intransient Matrix Overseer Network with Nahida’s Elemental Skill, which would constantly apply Dendro on the boss for a period of time.
This, coupled with Raiden Shogun’s Elemental Skill, would result in constant Dendro- Electro elemental reactions.
Nahida plays a Sub DPS/ Support role where her off-field damage dealing/ Dendro application capabilities will shine while she spends most of her time off-field.
Synchronizing her Dendro application along with Raiden Shogun’s Electro application will decide how easy the battle will be. Usually, players will not recommend this team comp since it is not “meta,” but I do use this team, and they get the job done quickly.
However, for repeated runs, players will need to keep the energy levels of the entire team high enough; otherwise, most of the damage that can be done will not be inflicted on the Algorithm of Semi-Intransient Matrix Overseer Network.
Fischl will be used in this team comp and the next one as well; the reason behind her importance in this battle would be her Elemental Burst because it will help locate the boss in its invisible state.
Additionally, she can act as a battery in this team comp, resulting in a very rapid restoration of energy for the Elemental Bursts of each respective character.
Ideally, with the right timing., players can keep Nahida’s Elemental Burst through the duration of the entire fight, resulting in bonus entry regeneration for all of the characters in the team.
Yes, there are better healers than Jean available in Genshin Impact because they offer more than just healing, but for this team comp, Jean is perfect. The reason that I selected Jean lies primarily in her inert element; as we know, Anemo does not react with Dendro, but Anemo does react with Electro.
Unfortunately, Jean can not be used throughout the battle; players should only use Jean after Dendro and Electro reactions take place in order to avoid Electro Swirl reactions.
Jean is a competent healer since she heals the entire team in one go; therefore, I highly doubt that players would run the risk of having any characters die.
Alternate Team Comp
- Main DPS – Tighnari, Weapon – Hunter’s Path
- Sub DPS – Yae Miko, Weapon – Kagura’s Verity
- Support – Fischl, Weapon – Rust
- Healer – Diona, Weapon – Sacrificial Bow
Now, onto a more meta-relevant team comp, we have Tighnari leading the front line alongside Yae Miko and her Electro application. Since Tighnari is a bow user, players can utilize his long-range attributes when it comes to extra Dendro applications.
However, in order to guarantee that his Elemental Skill and Elemental Burst will apply more than enough Dendro, players would have to get close to the boss.
I would recommend using Tighnari’s Elemental Skill and/ or Elemental Burst when the Algorithm of Semi-Intransient Matrix Overseer Network is stationary.
Although I have stated that Yae Miko is a Sub DPS character, in this team comp, she is a co-Main DPS character, although most of the on-field damage will be dealt by Tighnari.
Yae Miko will do most of her damage through her Elemental Skill; in my opinion, she has excellent Electro application when it comes to Dendro reaction-based team comps.
I would recommend swapping out for Yae Miko after Tighnari’s Elemental Burst is activated because it will give players more chances to conduct Dendro- Electro based reactions through Yae Miko’s normal/ charged attacks on top of her Elemental Skill and Elemental Burst.
Once again, Fischl will have a dual role, one where she acts as the battery for the team and the second where she can help locate the Algorithm of Semi-Intransient Matrix Overseer Network once it turns invisible. Additionally, Fishcl’s off-field damage-dealing capabilities through her Elemental Burst will be helpful for Tighnari because the additional Electro application will leave space for more elemental reactions with Dendro.
Diona is an addition that comes with two significant positives and one cautionary warning. For this team comp, given the necessity for close combat, Diona’s shields and healing prowess will go a long way. However, because she applies Cryo during both her Elemental Skill and Elemental Burst, it is quite easy to create Superconduct elemental reactions, which will definitely interfere with the pre-planned Dendro- Electro reactions.
One way to avoid this would be to immediately attack the boss with Yae Miko’s normal attacks or charged attack in order to remove the Cryo application. Once this is done, players can easily get back to destroying this boss without having Cryo mess up any elemental reactions.
Rewards

As usual, we will have a look at the expected rewards from this boss and the uses of the specialized boss drop material.
The rewards for this boss include:
- Light Guiding Tetrahedron
- Adventure EXP
- Companionship EXP
- Mora
- Character ascension stones (Anemo and Pyro only)
- Five Star artifacts; Gladiators Finale, Wanderers Troupe, Instructor, Berserker
- Four Star artifacts; Gladiators Finale, Wanderers Troupe, Instructor, Berserker
- Three Star artifacts; Instructor, Berserker, Lucky Dog
- Two Star artifacts; Lucky Dog
Since this boss has been around for a few updates, players may or may not have collected its drops over the course of time. However, only three characters use the Light Guiding Tetrahedron; therefore, players do not have to worry too much. These characters are;
- Dehya
- Candace
- Faruzan
Of these three, Faruzan would be the most important one because she will be a vital Anemo buff for any Anemo team moving forward.
Therefore, for repeated runs, I would recommend any of the above team comps, but swap the Support character with a strong shielding character such as Zhongli, Diona, Thoma, or Layla; this way, players will not have to worry too much about the health of the characters, and instead they can unleash their most potent attacks/ combos.
I would not recommend farming this boss for fun and would only recommend farming the boss if a valuable character that requires the investment is received.
Achievements Related to the Algorithm of Semi-Intransient Matrix Overseer Network
Achievement Name: System Shock
This achievement is unlocked when players defeat the Algorithm of Semi-Intransient Matrix Overseer Network while it is paralyzed after it comes out of its “Overclocked State.”
Achievement Name: Daisy, Daisy
This achievement is unlocked after players use Dendro and Electro related reactions (Aggravate, Quicken, and Spread) to break the Algorithm of Semi-Intransient Matrix Overseer Network after hitting its cores.
Achievement Name: Establishing a Beachhead
This achievement is unlocked when the Algorithm of Semi-Intransient Matrix Overseer Network successfully carries through its Overclocked Attack; players can activate a shield and witness this happen, then the achievement will be unlocked with minimal difficulty.
Achievement Name: The Invisible Hand
This achievement is unlocked when players defeat the Algorithm of Semi-Intransient Matrix Overseer Network while it is still invisible; players can do this by using off-field DPS characters and by using markers (characters such as Tartaglia, Hutao, and Yoimiya can do this) to track its location while it remains invisible.
FAQs
Question: How Difficult is the Algorithm of Semi-Intransient Matrix Overseer Network?
Answer: This particular boss is not too difficult, in my opinion. However, players do need to use the correct team comps and utilize the elemental weakness toward Dendro-Electro reactions.
Especially in the Spiral Abyss, players cannot expect to power through this boss because it can go into different states; therefore, build Dendro-Electro reaction team comps.
Question: What Classification does the Algorithm of Semi-Intransient Matrix Overseer Network Fall Into?
Answer: The Algorithm of Semi-Intransient Matrix Overseer Network falls into the Automaton family of enemies available in Genshin Impact. It is one of the five available Automaton Normal Bosses in the game, but players should not worry too much because the attacks done by this boss are all physical.
Question: Why is the Algorithm of Semi-Intransient Matrix Overseer Network Inside a Pyramid?
Answer: As one of the fallen King Deshret’s creations, the Algorithm of Semi-Intransient Matrix Overseer Network is one of his largest creations, and it lies in the desert away from Sumeru following the collapse of King Deshret’s empire?
Therefore, it is fitting for the Algorithm of Semi-Intransient Matrix Overseer Network to reside in one of the great pyramids left behind by King Deshret’s civilization.
Algorithm of Semi-Intransient Matrix Overseer Network: Final Remarks
In my opinion, this boss is not very difficult once the correct team comps are conjured and utilized. I do believe that having a character with a wide AoE of Dendro application (Nahida or Collei) coupled with a character with a very rapid Electro application (Raiden Sogun or Yae Miko) should make concise work of this boss.
Ideally, players should be looking to deal Dendro-Electro reactions throughout the battle in order to maximize the damage dealt to the boss.
Defeating this boss may seem difficult; however, after repeated interactions, players will have no issue dealing with it; the attack patterns are simple if memorized/ understood. In my opinion, players can make the encounter a lot more challenging and fun by creating a team to use “brute force” to try and outmuscle (metaphorically speaking) the boss rather than rely on strategy or tactics.
Other than that, in my opinion, this is one of the best-designed bosses, aesthetically speaking.
Not only does it capture the lore of how developed King Deshret’s civilization was, but the placement of the boss inside the pyramid, along with the way it changes its structure, makes it a very unique addition to this game that we all know and love.
- Genshin Impact Dragon of Vendure Guide - June 25, 2023
- Algorithm of Semi-Intransient Matrix Guide - June 13, 2023
- Genshin Impact Best Fan Theories - March 29, 2023